
 DC/OS Documentation
You can create and administer jobs for the DC/OS cluster in any of the following ways:
- interactively with the DC/OS web-based administrative console GUI.
- interactively or programmatically with DC/OS command-line interface (CLI) programs.
- directly through calls to the DC/OS application programming interface (API) for job-related operations.
The DC/OS application programming interface (API) for job-related operations provides the underlying functionality that you can access through the DC/OS web-based administrative console and command-line interface (CLI). In most cases, therefore, you would only use the API directly if you are integrating the functionality with a custom program or automation script.
Managing jobs with the DC/OS UI
You can manage the most common job-related activity interactively through the DC/OS UI. For example, you can add, modify, run, and remove jobs directly from the Jobs tab in the web-based console. However, the DC/OS UI only provides access to a subset of the job-related functionality provided through the dcos job CLI and Jobs API. For more advanced job configurations and activity, use the dcos job commands or the Jobs API.
Add a job
-
Navigate to the URL for the DC/OS web-based console in a web browser.
-
Click Jobs, then click Create a Job to display the New Job settings.
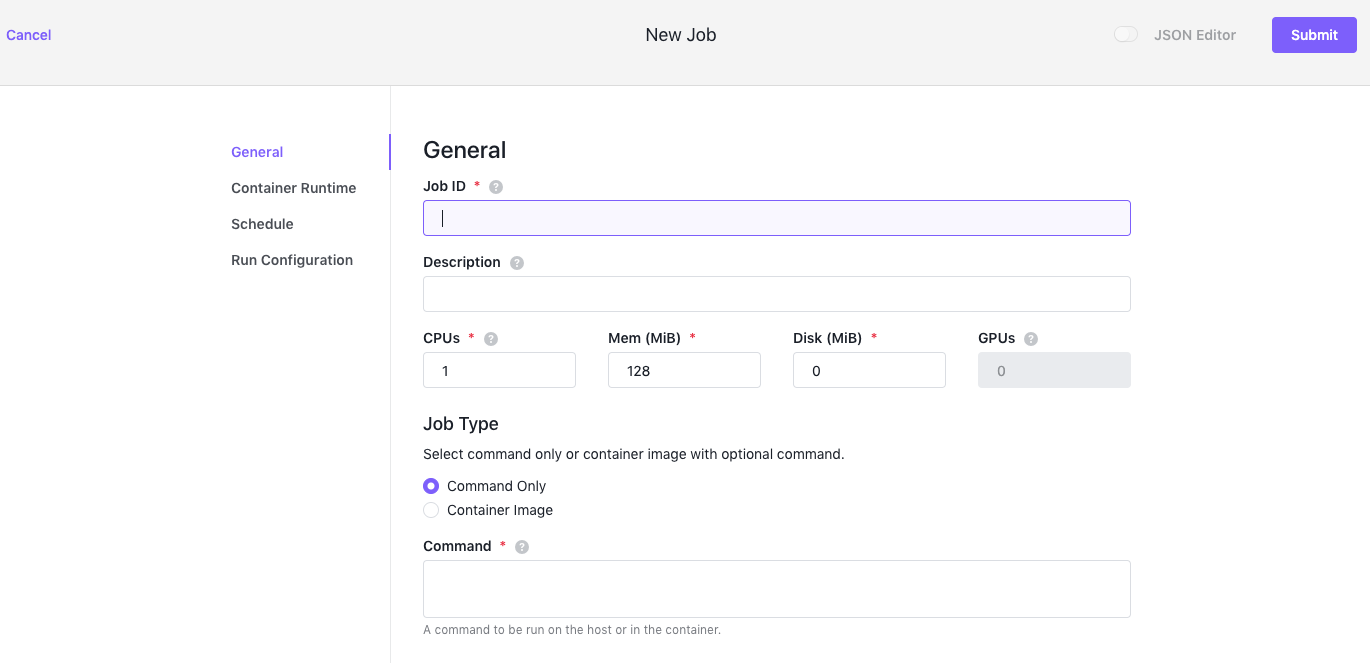
Figure 1. Create a Job
You can configure the job using the fields displayed or click JSON Editor to edit the JSON directly. If you click Jobs and see a list of previously-created jobs, click the plus (+) sign displayed above and to the right of the job list to create a new job.
-
Click General to edit the most basic job settings, such as the job identifier, CPU, memory, and disk requirements.
- Job ID - Defines a unique identifier for the new job. The Job ID is a required field. You also use this setting to manage job operations.
- Description - Provides an optional description of the new job.
- CPUs - Specifies the number of CPU cores your job requires. This field is required for all jobs.
- Mem - Specifies the amount of memory, in MB, your job requires. This field is required for all jobs.
- Disk - Specifies the amount of disk space, in MB, your job requires. This field is required for all jobs.
- GPUs - Specifies the number of GPU (Graphics Processing Unit) cores to allocate for processing your job. This field is only applicable for jobs that run on nodes configured to use GPU (Graphics Processing Unit) cores and tasks that are launched using DC/OS Universal Container Runtime containers. Support for GPU resources is are not available for Docker containers or images.
-
Select the appropriate Job Type to run one or more specific commands or a Docker container image.
-
Select Command Only to specify one or more commands you want the new job to execute.
If you select Command Only, you must specify the command or command arguments to execute. When the command you specify is executed, it is automatically wrapped by the command
/bin/sh -c job.cmd. You must include eithercmdorargsin the command to be executed. It is invalid to supply bothcmdandargsin the same job.If you select the Command Only option, none of the Container Runtime settings are applicable for the job. You can continue creating the job by defining Schedule settings, adding advanced Run Configuration options, or clicking Submit.
-
Select Container Image to specify a container image for the new job. If you select this option, type the name of the container image you want to run. For example, you can type a container image name such as
ubuntu:14.04. You can then use the Command field to specify the command and any additional runtime parameters available in the container for running the new job.If you select the Container Image option, you can continue creating the job by:
- Configuring Container Runtime settings for the job.
- Defining a job Schedule, if applicable.
- Adding advanced Run Configuration options, if applicable.
- Clicking Submit.
-
-
Click Container Runtime to specify whether the container for the new job runs using the Universal Container Runtime or the Docker engine.
-
If you select Universal Container Runtime, you can select Force Pull Image On Launch to automatically pull the latest image before launching each instance.
-
If you select Docker Engine, you can select the following additional options:
- Select Force Pull Image On Launch to automatically pull the latest image before launching each instance.
- Select Grant Runtime Privileges to run the specified Docker image in privileged mode.
- Click Add Parameter to specify additional Docker runtime parameter names and values for the new job, if applicable. You can add multiple parameter names and corresponding values by clicking Add Parameter for each parameter name and value you want to include.
- Click Add Arg to specify additional command-line arguments for the new job, if applicable. You can add multiple arguments by clicking Add Arg for each argument you want to include.
-
-
Click Schedule, then click Enable Schedule to specify a schedule for when the job runs.
Select Enable Schedule if you want to run the job using the schedule you define with the following settings:
-
Type a Schedule ID to define a unique identifier for the job schedule. The schedule identifier must be a string with at least 2 characters and it can only contain digits (
0-9), dashes (-), and lowercase letters (a-z). The schedule identifier must not begin or end with a dash. -
Select CRON Schedule to specify the schedule in
cronformat. Use this crontab generator for help. You can also set a Time Zone to apply to the cron schedule. For example, you might have nodes in different time zones and want to run the job using a standardized UTC time or a specific local time zone such as America/New_York. -
Select Starting Deadline to set the time, in seconds, to start the job if it misses its scheduled time for any reason. Missed job executions are counted as failed jobs.
-
Select Concurrency Policy if you want to allow new job instances to run if there’s already a job instance running.
After you define the schedule, you can activate or deactivate it by selecting or deselecting the Enable Schedule option. You can also modify or remove the schedule when needed after you have submitted the new job definition.
-
-
Click Run Configuration to specify advanced settings for the new job.
-
Set Max Launch Delay to specify the maximum number of seconds to wait for a job to start running after it is launched by a scheduled job run or manually by a user. If the job does not start running within the maximum number of seconds allowed, the job is aborted.
-
Set Kill Grace Period to configure the number of seconds between escalating from
SIGTERMtoSIGKILLwhen signalling tasks to terminate. During this grace period, tasks should perform an orderly shut down immediately upon receiving SIGTERM. -
Set User name to identify the user account that runs the tasks on the agent.
-
Select Add Artifact to provide one or more artifact URIs you want passed to fetcher module and resolved at runtime and the action–Execute, Extract, or Cache–you want to perform for each URI.

Figure 2. Add an artifact URI and action
-
Select a Restart Policy to determine the steps to take if a job fails.
-
You can choose Never if you never want to attempt to restart a failed job.
-
If you choose On Failure, you can set a time limit for attempting to restart the job using the Keep Trying Time field. For example, set the Keep Trying Time to 30 if you want to try restarting the job after waiting for 30 seconds. If no value is set for Keep Trying Time, DC/OS will continue attempting to restart the failed job indefinitely.
-
-
Click Add Label to specify a Key and Value that you want to attach as metadata to the new job. You can then use the job label to filter or expose information for labeled jobs. You can add multiple label key name/value pairs by clicking Add Label for each name/value pair you want to include. For more information about using labels, see Labeling tasks and jobs.
-
-
Click Submit to create the job.
-
Verify that you have added the new job by clicking Jobs.

Figure 3. Jobs list
Add a job to a job group
You can add a job to a an existing job group or create a new job group when you create the job. Use dots in your job ID to nest the job in a group. For example, if you add a job using the job ID marketing.myjob, the new myjob is created in the marketing job group. In DC/OS Enterprise, you can use job groups to implement fine-grained user access. For more information about controlling access to jobs through job groups, see Granting access to jobs.
View, modify, or remove a specific job
You can view and modify job-related information, including details about the run history and configuration settings interactively through the DC/OS UI. From the Jobs tab, click the name of your job. You can then use the menu on the upper right to edit, run, disable, or delete a selected job.
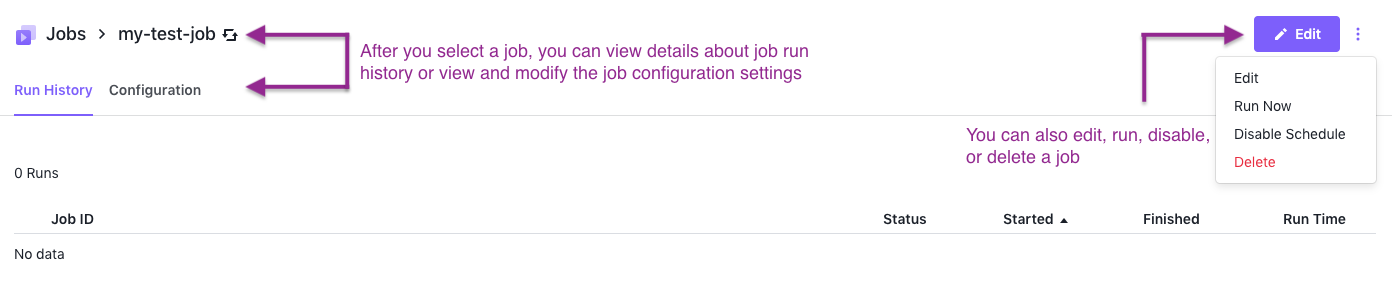
Figure 4. Viewing and modifying job details
While the job is running, you can click the job instance to drill down to Details, Files, and Logs data.
Managing jobs with the DC/OS CLI
You can create and manage jobs from the DC/OS CLI using dcos job commands. To see a full list of available commands with usage information, run dcos job --help.
Create a JSON file for a new job
-
Open a new file in a text editor to create a job file in JSON format.
-
In the new file, specify the basic parameters required to define the job, including the following:
- the job
idyou use to manage the job - the specific command to run
- the CPU, memory, and disk requirements
- the job schedule
For example, the JSON file for a new job might look similar to this:
{ "id": "myjob", "description": "A job that sleeps regularly", "run": { "cmd": "sleep 20000", "cpus": 0.01, "mem": 32, "disk": 0 }, "schedules": [ { "id": "sleep-schedule", "enabled": true, "cron": "20 0 * * *", "concurrencyPolicy": "ALLOW" } ] } - the job
-
Save the JSON file for the new job using an easily-identifiable file name. For example, you might save the job information as
mysleepjob.json. -
Add the job by running a command similar to the following:
dcos job add <myjob>.jsonFor example:
dcos job add mysleepjob.json -
Verify that you have added the new job by running a command similar to the following:
dcos job listThe command displays the list of jobs similar to the following:
    ID       STATUS    LAST RUN
mysleepjob  Scheduled  N/A
mypingjob   Running    N/A
Concurrency policy for scheduled jobs
If you use a schedule to start a job, you can define a concurrency policy for the job. A concurrency policy determines whether a new job run instance is triggered if there’s already a job instance running.
For example, assume you have a job scheduled to start every day at 3:00AM, and you have set the concurrency policy for the job set to FORBID. If there is an instance of that job already running at 3:00AM–either because a previously-triggered job run is still active or has been triggered manually outside of the schedule–the scheduled start time will not trigger a new job to run. If there are no jobs running at the next scheduled start time, a new job instance starts and runs as scheduled.
If you want to allow scheduled jobs to be triggered while other instances of the same job are running, you can set the concurrencyPolicy to ALLOW.
Note: A concurrencyPolicy set to FORBID does not prevent you from starting a new job instance manually - for example via the API - even if one is already running. It only prevents a schedule to start a new job instance.
MaxLaunchDelay
The maxLaunchDelay is a deprecated configuration option that is not used anymore
Restart policy
Per default, metronome only tries to start a job instance once - the default restart policy is NEVER. The alternative is to set the restart policy to ON_FAILURE, which configures metronome to restart the task until it completes successfully or the activeDeadlineSeconds is reached.
If no activeDeadlineSeconds is defined, metronome tries restarting the task indefinitely, which may lead to issues if the task will never complete successfully - it is advised to always set an activeDeadlineSeconds.
{
  ...
  "run" : {
    "cpus" : 0.01,
    "mem" : 32,
    "disk" : 0,
    "cmd" : "sleep 60",
    "restart" : {
      "policy" : "ON_FAILURE",
      "activeDeadlineSeconds" : 30
    }
  },
  ...
}
TaskKillGracePeriod
The taskKillGracePeriodSeconds can be used to define the time between the SIGTERM and SIGKILL that is send to a task on stop. See Marathons documentation on taskKillGracePeriodSeconds for more information
{
  ...
  "run" : {
    "cpus" : 0.01,
    "mem" : 32,
    "disk" : 0,
    "cmd" : "sleep 60",
    "taskKillGracePeriodSeconds" : 30
  },
  ...
}
Create a schedule-only JSON file
If you specify a schedule for a job in the JSON file for that job, you can assign only one schedule for the job to run under.
If you want to use the same schedule for more than one job, however, you can create a separate JSON file specifically for the schedule. You can then use the dcos job schedule add <job-id> <schedule-file> command to associate a job with the schedule.
-
Open a file in a text editor to create a new job file in JSON format, if necessary.
You must use the job
idyou define for the job to associate a schedule JSON file with the job. To prevent schedule conflicts or unexpected job runs, you should not define schedule parameters for a job if you want to use the schedule-only JSON file to control when a job runs. -
Open a new file in a text editor to create the schedule you want to use in JSON format.
For example, the JSON file for a new schedule might look similar to this:
{ "concurrencyPolicy": "ALLOW", "cron": "20 0 * * *", "enabled": true, "id": "nightly", "nextRunAt": "2016-07-26T00:20:00.000+0000", "startingDeadlineSeconds": 900, "timezone": "UTC" } -
Save the JSON file for the new schedule using an easily-identifiable file name. For example, you might save the schedule information as
my-cron-def.json. -
Associate the job with the schedule by running a command similar to the following:
dcos job schedule add <job-id> <schedule-file>For example:
dcos job schedule add mytestjob my-cron-def.jsonIf you attempt to add a schedule definition to a job that already has a schedule defined, the command displays an error similar to the following:
Error: 409 - requirement failed: A schedule with id nightly already exists -
Verify that you have added the new job schedule by running a command similar to the following:
dcos job schedule show mytestjobThis command displays schedule information for the specified job similar to the following:
ID        CRON     ENABLED            NEXT RUN            CONCURRENCY POLICY
nightly  20 0 * * *  True     2019-04-11T00:20:00.000+0000  ALLOW
Start a job from the command line
You can trigger a job to run:
- manually on-demand
- automatically based on a schedule you have defined
- programmatically through automation with or without a schedule
You can use any of these approaches to start a job instance that is referred to as a job run. For example, you can use the DC/OS command-line interface to start jobs regardless of whether you have defined a schedule or not. Starting a job manually from the command-line is similar to starting a job by clicking Run now using the DC/OS web-based console.
To start a job run on-demand outside of any scheduled job activity, run a command similar to the following:
dcos job run <job-id>
For example, if the job id is mytestjob, run:
dcos job run mytestjob
Starting a job manually from the command-line or through the DC/OS web-based console triggers a new job run each time the command is executed. Jobs that are triggered manually on-demand ignore concurrency policy settings.
If a schedule is used to start a job, however, the job’s concurrency policy determines whether a new job run instance is triggered. Being able to control whether jobs run concurrently is one of the main differences between triggering a job to run manually or using a schedule.
Remove a job from the command-line
You can remove a job using the command-line program dcos job remove dcos job remove <job-id> command.
To remove a job:
-
Check the status of active jobs by running a command similar to the following:
dcos job list -
Stop all running job instances for the job you want to delete and remove the job by running the following command:
dcos job remove <job-id> --stop-current-job-runs -
Verify that you have removed the specified job by running the following command:
dcos job list
Modify a job from the command line
To modify your job, update your JSON job file, then run
dcos job update <job-file>.json
Modify a job’s schedule
You can update the schedule of your job in two ways, depending if your job has a schedule specified in the <job-file>.json or if your job’s schedule is kept in a separate file.
Modify a job with a schedule
Modify the schedules parameter of your <job-file>.json. Then run
dcos job update <job-file>.json
Modify a job with a separate schedule file
Modify <schedule-file>.json. Then, run one of the following commands:
dcos job schedule add <job-id> <schedule-file>.json
dcos job schedule remove <job-id> <schedule-id>
dcos job schedule update <job-id> <schedule-file>.json
View job details
List all jobs:
dcos job list
List all previous runs of your job:
dcos job history <job-id>
To view details about your job, run:
dcos job show <job-id>
To view details about your job’s schedule, run:
dcos job schedule show <job-id>
View job logs
To view the log for your job:
dcos task log --completed <job-id>
To get the log for only a specific job run, use a job run ID from dcos job history <job-id>
dcos task log --completed <job-run-id>
Using the Jobs API
You can also create and administer jobs through calls to the Jobs API endpoints. This section highlights the most common tasks you perform through job-related API calls. For more complete information about the Jobs API, see the Jobs API reference information.
Preparing to use API cals
The code examples in this section illustrate how to include Jobs API calls to perform job-related tasks with the client URL (cURL) program. For detailed information about using curl command, see the curl man page.
In addition, one important difference between using the DC/OS command-line interface or web-based console and the API is how you configure the job schedule. The DC/OS CLI and web-based console support a combined JSON format that allows you to specify a schedule in the job descriptor. To schedule a job using the Jobs API, you must use two separate calls:
- Use one call to add an unscheduled job.
- Use a second call to associate a specific schedule file (
schedule-file.json) with the job.
Add a job using an API call
The following command adds a job called myjob.json.
curl -X POST -H "Content-Type: application/json" -H "Authorization: token=$(dcos config show core.dcos_acs_token)" $(dcos config show core.dcos_url)/service/metronome/v1/jobs -d@/Users/<your-username>/<myjob>.json
Remove a job using an API call
The following command removes a job regardless of whether the job is running:
curl -X DELETE -H "Authorization: token=$(dcos config show core.dcos_acs_token)" $(dcos config show core.dcos_url)/service/metronome/v1/jobs/<myjob>?stopCurrentJobRuns=true
To remove a job only if it is not running, set stopCurrentJobRuns to False.
Modify or view a job using an API call
The following command shows all jobs:
curl -H "Authorization: token=$(dcos config show core.dcos_acs_token)" $(dcos config show core.dcos_url)/service/metronome/v1/jobs
The following command lists job runs:
curl -H "Authorization: token=$(dcos config show core.dcos_acs_token)" "$(dcos config show core.dcos_url)/service/metronome/v1/jobs/<myjob>/runs/"
Stop a run with the following command:
curl -X POST -H "Authorization: token=$(dcos config show core.dcos_acs_token)" "$(dcos config show core.dcos_url)/service/metronome/v1/jobs/<myjob>/runs/20160725212507ghwfZ/actions/stop"
Add a schedule to a job
The following command adds a schedule to a job:
curl -X POST -H "Content-Type: application/json" -H "Authorization: token=$(dcos config show core.dcos_acs_token)" $(dcos config show core.dcos_url)/service/metronome/v1/jobs/<job-id>/schedules -d@<schedule-file>.json
Start a job using an API call
You can use the DC/OS API to start jobs programmatically. Similar to starting a job using the web-based console or command-line interface, you must specify the job identifer in the call.
To trigger a job run to start you can use a REST API call similar to the following:
curl -X POST -H "Authorization: token=$(dcos config show core.dcos_acs_token)" $(dcos config show core.dcos_url)/service/metronome/v1/jobs/{jobId}/runs