
 Kubernetes Documentation
Using HAProxy
DC/OS Kubernetes does not automatically expose the Kubernetes API for a given Kubernetes cluster outside of the DC/OS cluster.
Hence, in order to access the Kubernetes API for one or more Kubernetes clusters from outside the DC/OS cluster, you can set up a proxy that can reach the DC/OS VIP(s) exposing the Kubernetes API instance(s) inside the DC/OS cluster.
This VIP is apiserver.<SERVICE_NAME>.l4lb.thisdcos.directory:6443, where <SERVICE_NAME> is the service name you have provided when creating the Kubernetes cluster. By default the <SERVICE_NAME> is kubernetes-cluster, so, by default, the VIP is apiserver.kubernetes-cluster.l4lb.thisdcos.directory:6443.
In the next sections we present two examples you can follow in order to expose the Kubernetes API for a given Kubernetes cluster to outside the DC/OS cluster.
- The first example provides a way for quickly trying out DC/OS Kubernetes without being concerned about establishing trust. This example also only covers exposing a single Kubernetes API.
- The second example is an extension of the first that builds a fully-secured setup exposing multiple instances of the Kubernetes API for multiple Kubernetes clusters.
Alternately, if you are running Marathon-LB and/or Edge-LB in your DC/OS cluster, you may wish to expose the Kubernetes API for a given Kubernetes cluster via one of those. Details on how to do this are documented here.
In order for you to follow the examples successfully, your DC/OS cluster MUST have at least one public agent (that is, an agent that is on a network that allows ingress from outside the cluster). In the examples, <ip-of-public-agent> is the IP address you use to reach said public DC/OS agent. You MUST also have SSH access to this DC/OS public agent. Having followed these examples, you will end up with a setup similar to the following:
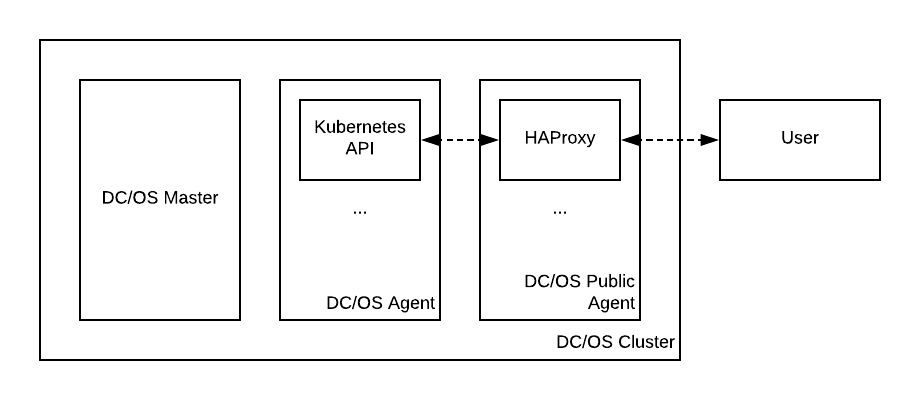
Figure 1. Exposing the Kubernetes API using HAProxy
Example 1: Using HAProxy and a self-signed certificate
This example focuses on exposing the Kubernetes API for a given Kubernetes cluster to outside the DC/OS cluster using HAProxy as an intermediate proxy and a self-signed wildcard certificate meant to secure the communication between the user and HAProxy.
Step 1: Creating a self-signed wildcard certificate
In order for HAProxy to secure connections between itself and the user, it must be given a TLS certificate and private key.
Since this example is meant only for exposing the Kubernetes API for a given Kubernetes cluster without any additional security concerns, a self-signed wildcard certificate will be generated and used.
In order to achieve this, you can use openssl:
openssl genrsa 2048 > haproxy-key.pem
openssl req -new -x509 -nodes -sha1 -days 3650 -key haproxy-key.pem \
  -subj "/C=US/ST=CA/L=SF/O=Mesosphere/OU=dcos-kubernetes/CN=*" > haproxy-crt.pem
cat haproxy-crt.pem haproxy-key.pem > haproxy.pem
Running these commands will create an haproxy.pem file in the current directory which will be used later on.
Step 2: Creating the HAProxy configuration
Run the following command (replacing the <SERVICE_NAME> placeholder as appropriate) in order to create a working HAProxy configuration:
$ cat <<EOF > haproxy.conf
global
    log 127.0.0.1 local0
    # Sets the maximum size of the Diffie-Hellman parameters used for generating
    # the ephemeral/temporary Diffie-Hellman key in case of DHE key exchange.
    tune.ssl.default-dh-param 2048
    # Enables debug mode which dumps to stdout all exchanges.
    # This should be disabled in production, as tokens will also be logged.
    debug

defaults
    log global
    mode http
    option httplog
    option dontlognull
    # Set appropriate values for timeouts. This is important so that calls such
    # as "kubectl exec" or "kubectl logs -f" do not exit prematurely due to
    # inactivity in the connection.
    timeout connect 10s
    timeout client 86400s
    timeout server 86400s
    timeout tunnel 86400s

frontend frontend_all
    bind :6443 ssl crt /haproxy/haproxy.pem
    mode http
    default_backend backend_kube_apiserver

backend backend_kube_apiserver
    mode http
    balance leastconn
    server kube-apiserver apiserver.<SERVICE_NAME>.l4lb.thisdcos.directory:6443 check ssl verify none
EOF
Running this command will create an haproxy.conf file in the current directory which will be used later on.
Step 3: Copying the certificate and the HAProxy configuration to the public agent
HAProxy will read its configuration and the required TLS certificates from a directory on the DC/OS public agent’s filesystem.
This can be any directory that the HAProxy process can access (represented as <path-to-haproxy-config-directory> in the steps below).
To copy the required TLS material over SSH to the DC/OS public agent, run the following commands (replacing the placeholders as appropriate):
$ ssh <user>@<ip-of-public-agent> \
    mkdir <path-to-haproxy-config-directory>
$ scp haproxy.pem \
    haproxy.conf \
    <user>@<ip-of-public-agent>:<path-to-haproxy-config-directory>
haproxy.pem     100%    2985    16.9KB/s    00:00
haproxy.conf    100%    1041     5.9KB/s    00:00
For example, if your SSH user is core, the IP of your public agent is 35.233.213.97, and you want to install certificates in /opt/haproxy, you should run:
$ ssh core@35.233.213.97 mkdir /opt/haproxy
$ scp haproxy.pem haproxy.conf core@35.233.213.97:/opt/haproxy
Step 4: Running HAProxy
In this step, HAProxy is configured to run as a Marathon application on the DC/OS public agent.
Use the following commands to do so (replacing <path-to-haproxy-config-directory> as appropriate):
$ cat <<EOF > marathon.json
{
  "id": "/kubernetes-haproxy",
  "acceptedResourceRoles": [
    "slave_public"
  ],
  "cmd": "/usr/local/sbin/haproxy -f /haproxy/haproxy.conf",
  "constraints": [
    [
      "hostname",
      "UNIQUE"
    ]
  ],
  "container": {
    "type": "MESOS",
    "volumes": [
      {
        "containerPath": "/haproxy",
        "hostPath": "<path-to-haproxy-config-directory>",
        "mode": "RO"
      }
    ],
    "docker": {
      "image": "haproxy:1.8.14",
      "forcePullImage": false,
      "parameters": []
    }
  },
  "cpus": 0.1,
  "instances": 1,
  "mem": 128,
  "networks": [
    {
      "mode": "host"
    }
  ],
  "portDefinitions": [
    {
      "protocol": "tcp",
      "port": 6443
    }
  ],
  "requirePorts": true
}
EOF
dcos marathon app add marathon.json
When HAProxy is deployed, you should see the following:
$ dcos task
NAME                HOST        USER    STATE  ID                                                       MESOS ID                                 REGION    ZONE
(...)
kubernetes-haproxy  10.138.0.7  root    R      kubernetes-haproxy.beaca041-5e7c-11e8-8c11-ce5fc4b24b83  cc965893-270f-4809-9617-e190904dae27-S0  us-west1  us-west1-b
It should now be possible to reach the Kubernetes API:
$ curl -k https://<ip-of-public-agent>:6443
{
  "kind": "Status",
  "apiVersion": "v1",
  "metadata": {

  },
  "status": "Failure",
  "message": "forbidden: User \"system:anonymous\" cannot get path \"/\"",
  "reason": "Forbidden",
  "details": {

  },
  "code": 403
}
To configure kubectl to access the Kubernetes API using this setup, follow the steps described in the “Without TLS verification” subsection of the Connecting Clients page.
Example 2: Using HAProxy and establishing trust
The solution presented in Example 1 has a few shortcomings:
- The certificate presented by the Kubernetes API to HAProxy is not validated.
- The certificate presented by HAProxy to the user is too broad (and also not validated).
- The target Kubernetes API will be accessed at the DC/OS public agent’s IP address.
- HAProxy will route all incoming traffic to the target Kubernetes API VIP.
- It does not support exposing multiple Kubernetes APIs for multiple Kubernetes clusters.
In a production scenario, the above points should be addressed, both in order to increase the overall security of the solution and to be able to expose the Kubernetes API for multiple Kubernetes clusters using the same HAProxy instance.
This example builds on the previous one and focuses on addressing all these shortcomings. In what follows, <SERVICE_NAME_1> and <SERVICE_NAME_2> represent the names of two different Kubernetes clusters (e.g. dev/kubernetes01 and dev/kubernetes02).
Step 1: Validating the Kubernetes API certificate
In order for HAProxy to fully secure connections between itself and each instance of the Kubernetes API, it must be told how to trust the TLS certificate presented by these instances. This is done by letting HAProxy know that the certificate authority that signs each of the abovementioned certificates is trustworthy. To do this, retrieve each of these certificate authorities:
dcos task exec <SERVICE_NAME_1>.kube-control-plane-0-instance cat ca-crt.pem > <SERVICE_NAME_1>-ca.pem
It should be noted that if <SERVICE_NAME_1> contains slashes, these slashes should be replaced by a dot (.) in the command above. For example, if one of your Kubernetes clusters is called dev/kubernetes01, you must run:
dcos task exec dev.kubernetes01__kube-control-plane-0-instance cat ca-crt.pem > dev.kubernetes01-ca.pem
Running this command will create a <SERVICE_NAME_1>-ca.pem file in the current directory which must be copied to the <path-to-haproxy-config-directory> directory in the DC/OS public agent.
In DC/OS, these instructions must be repeated for <SERVICE_NAME_2>. In DC/OS Enterprise it is enough to run this step once, and <SERVICE_NAME_1>-ca.pem can be renamed to something more generic (e.g. dcos-ca.pem).
The HAProxy configuration must also be updated accordingly:
backend backend_<SERVICE_NAME_1>
    (...)
    server kube-apiserver apiserver.<SERVICE_NAME_1>.l4lb.thisdcos.directory:6443 check ssl verify required ca-file /haproxy/<SERVICE_NAME_1>-ca.pem

backend backend_<SERVICE_NAME_2>
    (...)
    server kube-apiserver apiserver.<SERVICE_NAME_2>.l4lb.thisdcos.directory:6443 check ssl verify required ca-file /haproxy/<SERVICE_NAME_2>-ca.pem
Notice how the existing backend entry is being updated to contain <SERVICE_NAME_1> in its name and definition, and duplicated so that HAProxy knows how to reach the two instances of the Kubernetes API.
This configuration requires further updates. Hence, it is not necessary to copy it over to the public DC/OS agent(s) just yet.
Step 2: Validating the HAProxy certificate
In Example 1 a self-signed, wildcard certificate was used.
In a production scenario, a valid certificate signed by a well-known, trusted certificate authority should be used instead.
Each instance of the Kubernetes API should also be accessed using a stable domain name such as devkubernetes01.example.com rather than an IP address.
Requirements:
- A certificate (and matching private key) valid for each of the domains used to expose the Kubernetes API (for example,
devkubernetes01.example.comanddevkubernetes02.example.com). - The CA certificate(s) of above certificate (in case these are not already trusted by the operating system);
- DNS is configured in such a way that each of the abovementioned domains resolve to the IP address(es) of the public DC/OS agent(s) where HAProxy will be running (for example,
devkubernetes01.example.comanddevkubernetes02.example.comboth resolve to35.233.213.97s).
How these three items are addressed is highly dependent on your setup, and as such, for the remaining of this example it is assumed that these requirements have been met.
Replace the haproxy.pem file created in Example 1 with new files, each containing:
- The certificate for the target domain;
- The private key for the target domain;
- The CA certificate (or certificate chain) for the target domain;
Certificates and keys MUST be concatenated in that particular order.
Then, copy each new file over to the <path-to-haproxy-config-directory> directory of the public DC/OS agent(s).
Finally, update the HAProxy configuration according to the following example:
frontend frontend_all
    # /haproxy/devkubernetes01.pem contains the certificate and key for devkubernetes01.example.com
    # /haproxy/devkubernetes02.pem contains the certificate and key for devkubernetes02.example.com
    bind :6443 ssl crt /haproxy/devkubernetes01.pem crt /haproxy/devkubernetes02.pem
    (...)
Step 3: Serving multiple Kubernetes API instances using HAProxy
In order to expose the Kubernetes API for both <SERVICE_NAME_1> and <SERVICE_NAME_2> using the same instance of HAProxy, we will use HAProxy’s Server Name Indication feature.
To do this, update the frontend section of the HAProxy configuration accordingly to forward requests to each Kubernetes API VIP based on the domain used in the request. For example, when wanting to expose the Kubernetes API for both dev/kubernetes01 and dev/kubernetes02, you should configure HAProxy according to the following example:
frontend frontend_all
    (...)
    # Inspect the SNI field from incoming TLS connections so we can forward to
    # the appropriate backend based on the server name.
    use_backend backend_devkubernetes01 if { ssl_fc_sni devkubernetes01.example.com }
    use_backend backend_devkubernetes02 if { ssl_fc_sni devkubernetes02.example.com }
Notice how backend_devkubernetes01 and backend_devkubernetes02 match the names of the backends defined in the first step.
Additional forwarding rules can be set up for other domains as required, regardless of whether they correspond to other instances of the Kubernetes API or to completely different services.
For further information, refer to the HAProxy documentation.
Step 4: Configuring kubectl
To configure kubectl to access the Kubernetes API using this setup, follow the steps described in the “With TLS verification” subsection of the Connecting Clients page.