
 Jenkins Documentation
About provisioning Jenkins with a service account
Whether you can or must provision Jenkins with a service account varies by security mode.
disabled: not possiblepermissive: optionalstrict: required
To increase the security of your cluster and conform to the principle of least privilege, we recommend provisioning Jenkins with a service account in permissive mode. Otherwise, Marathon and Metronome will act as if Jenkins was provisioned with a service account which has the superuser permission.
To set up a service account for Jenkins, complete the following steps.
- Create a key pair.
- Create a service account.
- Create a service account secret.
- Provision the service account with the necessary permissions.
- Create a config.json file.
Requirement: In strict mode, the name of the service account must match the name that the service uses as its principal. By default, Jenkins uses jenkins-principal as the name of its principal. That’s the value that we use in the following procedures. Should you modify the default, you must change jenkins-principal throughout to match.
Note: We will use jenkins-secret as the name of the secret, jenkins-private-key.pem as the name of the file containing the private key, and jenkins-public-key.pem as the name of the file containing the public key. We recommend using these names, as it will make it easier to copy and paste the commands. If you change the names, make sure to modify the commands before issuing them.
Important: We store the secret in the jenkins path. This protects it from other services, so we do not recommend changing this.
Create a key pair
First, you’ll need to generate a 2048-bit RSA public-private key pair. While you can use any tool to accomplish this, the Enterprise DC/OS CLI is the most convenient because it returns the keys in the exact format required.
Prerequisite: You must have the DC/OS CLI installed and the Enterprise DC/OS CLI 0.4.14 or later installed.
-
Create a public-private key pair and save each value into a separate file within the current directory.
dcos security org service-accounts keypair jenkins-private-key.pem jenkins-public-key.pem -
Type
lsto view the two new files created by the command. You may also want to open the files themselves and verify their contents. -
Continue to the next section.
Create a service account
About creating a service account
Next, you must create a service account. This section describes how to use either the Enterprise DC/OS CLI or the web interface to accomplish this.
Using the Enterprise DC/OS CLI
Prerequisite: You must have the DC/OS CLI installed, the Enterprise DC/OS CLI 0.4.14 or later installed, and be logged in as a superuser via dcos auth login.
-
Use the following command to create a new service account called
jenkins-principalwith the public key you just generated.dcos security org service-accounts create -p jenkins-public-key.pem -d "Jenkins service account" jenkins-principal -
Verify your new service account using the following command.
dcos security org service-accounts show jenkins-principal -
Continue to Create a service account secret.
Using the web interface
-
In the DC/OS web interface, navigate to the Organization -> Service Accounts tab.
-
Click the + icon in the top right.
-
Enter a description and type
jenkins-principalinto the ID field. -
Paste the public key associated with the account into the large text field.
-
Continue to the next section.
Create a service account secret
About creating a service account secret
Next, you need to create a secret associated with the service account that contains the private key. This section describes how to use either the Enterprise DC/OS CLI or the web interface to accomplish this.
Using the Enterprise DC/OS CLI
Prerequisite: You must have the DC/OS CLI installed, the Enterprise DC/OS CLI 0.4.14 or later installed, and be logged in as a superuser via dcos auth login.
-
Depending on your security mode, use one of the following commands to create a new secret called
jenkins-secretin thejenkinspath. Locating the secret inside thejenkinspath will ensure that only the Jenkins service can access it. The secret will contain the private key, the name of the service account, and other data.strict:
dcos security secrets create-sa-secret --strict jenkins-private-key.pem jenkins-principal jenkins/jenkins-secretpermissive:
dcos security secrets create-sa-secret jenkins-private-key.pem jenkins-principal jenkins/jenkins-secret -
Ensure the secret was created successfully:
dcos security secrets list / -
If you have jq 1.5 or later installed, you can also use the following command to retrieve the secret and ensure that it contains the correct service account ID and private key.
dcos security secrets get /jenkins/jenkins-secret --json | jq -r .value | jqImportant: While reviewing the secret, ensure that the
login_endpointURL uses HTTPS if you are instrictmode and HTTP if you are inpermissivemode. If the URL begins withhttpsand you are inpermissivemode, try upgrading the Enterprise DC/OS CLI, deleting the secret, and recreating it. -
Now that you have stored the private key in the Secret Store, we recommend deleting the private key file from your file system. This will prevent bad actors from using the private key to authenticate to DC/OS.
rm -rf jenkins-private-key.pem -
Continue to Provision the service account with permissions.
Using the web interface
-
Log in to the DC/OS web interface as a user with the
dcos:superuserpermission. -
Open the Security -> Secrets tab.
-
Click the + icon in the top right.
-
Type
jenkins/jenkins-secretinto the ID field to create a new secret calledjenkins-secretin thejenkinspath. Locating the secret inside thejenkinspath will ensure that only the Jenkins service can access it. -
If you have a
strictcluster, paste the following JSON into the Value field.
{
    "scheme": "RS256",
    "uid": "jenkins-principal",
    "private_key": "<private-key-value>",
    "login_endpoint": "https://master.mesos/acs/api/v1/auth/login"
}
If you have a permissive cluster, paste the following JSON into the Value field.
{
    "scheme": "RS256",
    "uid": "jenkins-principal",
    "private_key": "<private-key-value>",
    "login_endpoint": "http://master.mesos/acs/api/v1/auth/login"
}
-
Replace
<private-key-value>with the value of the private key created in Create a key pair. -
Click Create. Your secret has been stored!
-
Continue to the next section.
Provision the service account with permissions
About the permissions
The permissions needed vary according to your security mode. In permissive mode, the Jenkins service account does not need any permissions. If you plan to upgrade at some point to strict mode, we recommending assigning them the permissions needed in strict mode to make the upgrade easier. The permissions will not have any effect until the cluster is in strict mode. If you plan to remain in permissive mode indefinitely, skip to Create a config.json file.
If you are in strict mode or want to be ready to upgrade to strict mode, continue to the next section.
Creating and assigning the permissions
With the following curl commands you can rapidly provision the Jenkins service account with the permissions required in strict mode. These commands can be executed from outside of the cluster. All you will need is the DC/OS CLI installed. You must also log in via dcos auth login as a superuser.
Prerequisite: If your security mode is permissive or strict, follow the steps in Obtaining and passing the DC/OS certificate in curl requests before issuing the curl commands in this section. If your security mode is disabled, you must delete --cacert dcos-ca.crt from the commands before issuing them.
-
Issue the following commands to create the necessary permissions.
Note: There is always a chance that the permission has already been added. If so, the API returns an informative message. Consider this a confirmation and continue to the next one.
curl -X PUT --cacert dcos-ca.crt -H "Authorization: token=$(dcos config show core.dcos_acs_token)" $(dcos config show core.dcos_url)/acs/api/v1/acls/dcos:mesos:master:task:user:nobody -d '{"description":"Allows Linux user nobody to execute tasks"}' -H 'Content-Type: application/json' curl -X PUT --cacert dcos-ca.crt -H "Authorization: token=$(dcos config show core.dcos_acs_token)" $(dcos config show core.dcos_url)/acs/api/v1/acls/dcos:mesos:master:framework:role:* -d '{"description":"Controls the ability of jenkins-role to register as a framework with the Mesos master"}' -H 'Content-Type: application/json' -
Grant the permissions and the allowed actions to the service account using the following commands.
curl -X PUT --cacert dcos-ca.crt -H "Authorization: token=$(dcos config show core.dcos_acs_token)" $(dcos config show core.dcos_url)/acs/api/v1/acls/dcos:mesos:master:framework:role:*/users/jenkins-principal/create curl -X PUT --cacert dcos-ca.crt -H "Authorization: token=$(dcos config show core.dcos_acs_token)" $(dcos config show core.dcos_url)/acs/api/v1/acls/dcos:mesos:master:task:user:nobody/users/jenkins-principal/create -
Continue to the next section.
Create a config.json file
The contents of the config.json file will vary according to your security mode. We provide two examples below, one for each security mode. Locate the sample appropriate to your security mode, copy the JSON, paste it into a new file, and save it as config.json.
strict mode
{
  "security": {
    "secret-name": "jenkins/jenkins-secret",
    "strict-mode": true
  },
  "service": {
    "user": "nobody"
  }
}
permissive mode
{
  "security": {
    "secret-name": "jenkins/jenkins-secret"
  },
  "service": {
    "user": "nobody"
  }
}
If you have modified any of the values shown in the previous sections, change the values in the following JSON as appropriate.
Continue to the next section.
Install Jenkins
To install the service, complete the following steps.
-
Use the following command.
dcos package install --options=config.json jenkins -
Paste the following path into your browser, replacing
cluster-urlwith your actual cluster URL:https://<cluster-url>/service/jenkins/configure. -
Scroll to the Mesos cloud area.
-
Next to the Framework credentials field, click the Add button and select Jenkins.
-
In the Username field, type
jenkins-principal. -
In the Password field, type any value.
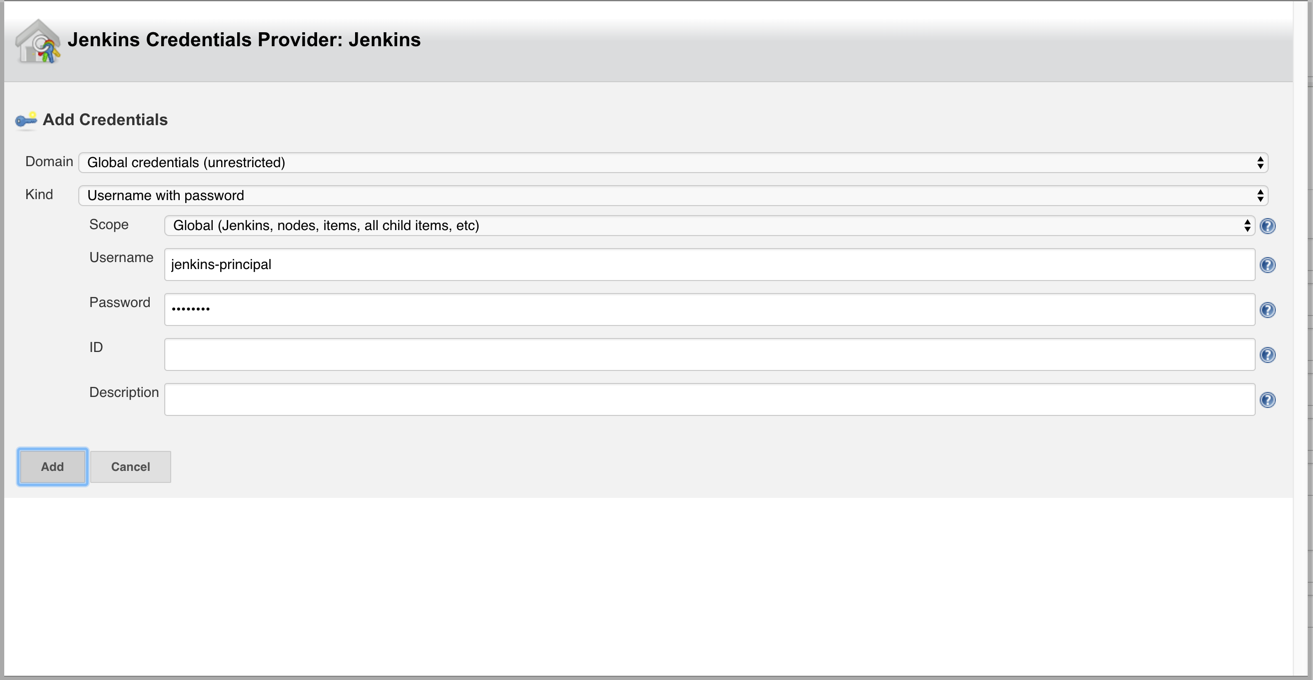
-
Once you have completed your entries, click Add.
-
Click Apply and then click Save.
-
Select the new jenkins-principal account in the Framework credentials list box.
-
Click New item in the side menu.
-
Click the Freestyle project button, type Test service account in the Enter an item name field, and press ENTER.
-
Scroll down to the Build area.
-
Click Add build step and select Execute shell.
-
Type
echo "hello world"in the Command field. -
Click Save.
-
The browser should display a Project test service account page.
-
Click Build now from the side menu.
-
After some time, the job should turn green in the Build history box. Congratulations! You have succeeded in setting Jenkins up with a service account.
You can also provide the config.json file to someone else to install Jenkins. Please see the Jenkins documentation for more information about how to use the JSON file to install the service.