
 DC/OS Documentation
This page outlines how to install DC/OS for production. Using this method, you can package the DC/OS distribution and connect to every node manually to run the DC/OS installation commands. This installation method is recommended if you want to integrate with an existing system or if you do not have SSH access to your cluster.
The DC/OS installation process requires a bootstrap node, master node, public agent node, and a private agent node. You can view the nodes documentation for more information.
Production Installation Process
The following steps are required to install DC/OS clusters:
- Configure bootstrap node
- Install DC/OS on master node
- Install DC/OS on agent node
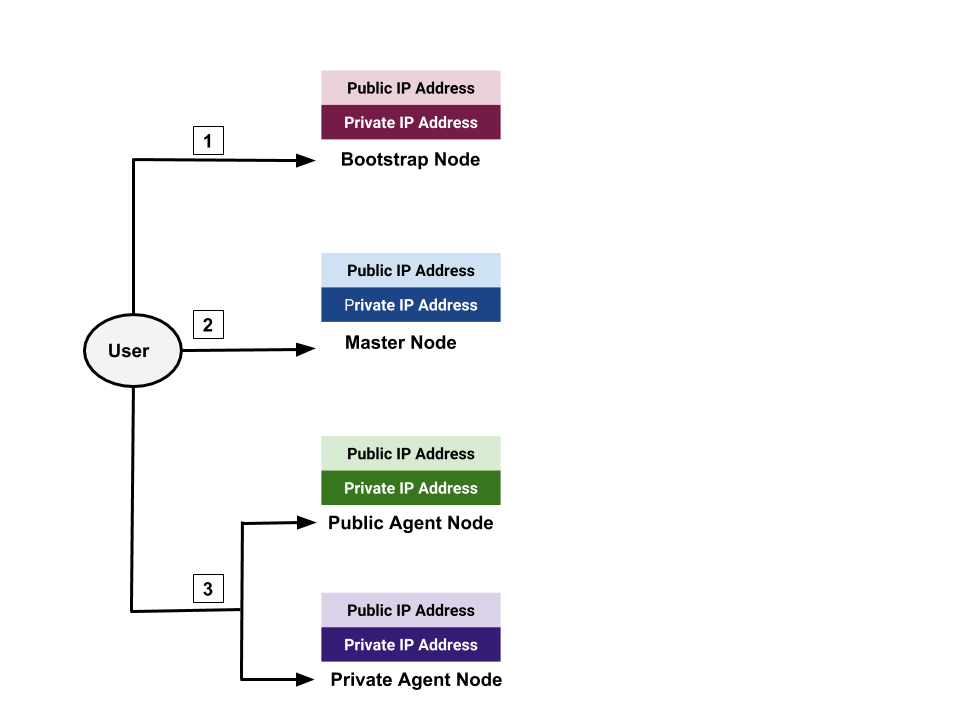 Figure 1. The production installation process
This installation method requires the following:
- The bootstrap node must be network accessible from the cluster nodes.
- The bootstrap node must have the HTTP(S) ports open from the cluster nodes.
The DC/OS installation creates the following folders:
| Folder | Description |
|---|---|
/opt/mesosphere |
Contains the DC/OS binaries, libraries, and cluster configuration. Do not modify. |
/etc/systemd/system/dcos.target.wants |
Contains the systemd services that start the systemd components. They must be located outside of /opt/mesosphere because of systemd constraints. |
/etc/systemd/system/dcos.<units> |
Contains copies of the units in /etc/systemd/system/dcos.target.wants. They must be at the top folder as well as inside dcos.target.wants. |
/var/lib/dcos/exhibitor/zookeeper |
Contains the ZooKeeper data. |
/var/lib/docker |
Contains the Docker data. |
/var/lib/dcos |
Contains the DC/OS data. |
/var/lib/mesos |
Contains the Mesos data. |
Prerequisites
Before installing DC/OS, your cluster must meet the software and hardware requirements.
Configure your cluster
-
Create a directory named
genconfon your bootstrap node and navigate to it.mkdir -p genconf
Store license file Enterprise
- Create a license file containing the license text received in email sent by your Authorized Support Contact and save as
genconf/license.txt.
Create an IP detection script
In this step, an IP detection script is created. This script reports the IP address of each node across the cluster. Each node in a DC/OS cluster has a unique IP address that is used to communicate between nodes in the cluster. The IP detection script prints the unique IPv4 address of a node to STDOUT each time DC/OS is started on the node.
-
Create an IP detection script for your environment and save as
genconf/ip-detect. This script needs to beUTF-8encoded and have a valid shebang line. You can use the examples below.-
Use the AWS Metadata Server
This method uses the AWS Metadata service to get the IP address:
#!/bin/sh # Example ip-detect script using an external authority # Uses the AWS Metadata Service to get the node's internal # ipv4 address curl -fsSL http://169.254.169.254/latest/meta-data/local-ipv4 -
Use the GCE Metadata Server
This method uses the GCE Metadata Server to get the IP address:
#!/bin/sh # Example ip-detect script using an external authority # Uses the GCE metadata server to get the node's internal # ipv4 address curl -fsSl -H "Metadata-Flavor: Google" http://169.254.169.254/computeMetadata/v1/instance/network-interfaces/0/ip -
Use the IP address of an existing interface
This method discovers the IP address of a particular interface of the node.
If you have multiple generations of hardware with different internal IP address, the interface names can change between hosts. The IP detect script must account for the interface name changes. The example script could also be confused if you attach multiple IP addresses to a single interface, or do complex Linux networking, etc.
#!/usr/bin/env bash set -o nounset -o errexit export PATH=/usr/sbin:/usr/bin:$PATH echo $(ip addr show eth0 | grep -Eo '[0-9]{1,3}\.[0-9]{1,3}\.[0-9]{1,3}\.[0-9]{1,3}' | head -1) -
Use the network route to the Mesos master
This method uses the route to a Mesos master to find the source IP address to then communicate with that node.
In this example, we assume that the Mesos master has an IP address of
172.28.128.3. You can use any language for this script. Your Shebang line must be pointed at the correct environment for the language used and the output must be the correct IP address.Enterprise
-
#!/usr/bin/env bash
set -o nounset -o errexit
MASTER_IP="172.28.128.3"
echo $(ip route show to match $MASTER_IP | grep -Eo '[0-9]{1,3}\.[0-9]{1,3}\.[0-9]{1,3}\.[0-9]{1,3}' | tail -1)
Open Source
#!/usr/bin/env bash
set -o nounset -o errexit -o pipefail
export PATH=/sbin:/usr/sbin:/bin:/usr/bin:$PATH
MASTER_IP=$(dig +short master.mesos || true)
MASTER_IP=${MASTER_IP:-172.28.128.3}
INTERFACE_IP=$(ip r g ${MASTER_IP} | \
awk -v master_ip=${MASTER_IP} '
BEGIN { ec = 1 }
 {
  if($1 == master_ip) {
        print $7
        ec = 0
 } else if($1 == "local") {
        print $6
        ec = 0
 }
      if (ec == 0) exit;
    }
      END { exit ec }
    ')
    echo $INTERFACE_IP
Create a fault domain detection script Enterprise
By default, DC/OS clusters have fault domain awareness enabled, so no changes to your config.yaml are required to use this feature. However, you must include a fault domain detection script named fault-domain-detect in your ./genconf directory. To opt out of fault domain awareness, set the fault_domain_enabled parameter of your config.yaml file to false.
-
Create a fault domain detect script named
fault-domain-detectto run on each node to detect the node’s fault domain. During installation, the output of this script is passed to Mesos.We recommend a script like this:
  #!/bin/sh

  REGION="<enter region name>"
  ZONE="<enter zone name>"

  echo "{
      \"fault_domain\": {
          \"region\": {
              \"name\": \"${REGION}\"
          },
          \"zone\": {
              \"name\": \"${ZONE}\"
          }
      }
  }"
We provide fault domain detect scripts for AWS and Azure nodes. For a cluster that has aws nodes and azure nodes you would combine the two into one script. You can use these as a model for creating a fault domain detect script for an on premises cluster.
- Add your newly created
fault-domain-detectscript to the/genconfdirectory of your bootstrap node.
Create a configuration file
In this step, you can create a YAML configuration file that is customized for your environment. DC/OS uses this configuration file during installation to generate your cluster installation files.
Set up a super user password Enterprise
In the following instructions, we assume that you are using ZooKeeper for shared storage.
-
From the bootstrap node, run this command to create a hashed password for superuser authentication, where
<superuser_password>is the superuser password. -
Save the hashed password key for use in the
superuser_password_hashparameter in yourconfig.yamlfile.sudo bash dcos_generate_config.ee.sh --hash-password <superuser_password>Here is an example of a hashed password output.
Extracting an image from this script and loading it into a docker daemon, can take a few minutes.
dcos-genconf.9eda4ae45de5488c0c-c40556fa73a00235f1.tar
Running mesosphere/dcos-genconf docker with BUILD_DIR set to /home/centos/genconf
00:42:10 dcos_installer.action_lib.prettyprint:: ====> HASHING PASSWORD TO SHA512
00:42:11 root:: Hashed password for 'password' key:
$6$rounds=656000$v55tdnlMGNoSEgYH$1JAznj58MR.Bft2wd05KviSUUfZe45nsYsjlEl84w34pp48A9U2GoKzlycm3g6MBmg4cQW9k7iY4tpZdkWy9t1
Create the configuration
- Create a configuration file and save as
genconf/config.yaml. You can use this template to get started.
The Enterprise template specifies three Mesos masters, static master discovery list, internal storage backend for Exhibitor, a custom proxy, security mode specified, and cloud specific DNS resolvers. Enterprise
The Open Source template specifies three Mesos masters, three ZooKeeper instances for Exhibitor storage, static master discovery list, internal storage backend for Exhibitor, a custom proxy, and cloud specific DNS resolvers. Open Source
If your servers are installed with a domain name in your /etc/resolv.conf, add the dns_search parameter. For parameter descriptions and configuration examples, see the documentation.
Enterprise template Enterprise
bootstrap_url: http://<bootstrap_ip>:80
cluster_name: <cluster-name>
superuser_username:
superuser_password_hash:
exhibitor_storage_backend: static
master_discovery: static
ip_detect_public_filename: <relative-path-to-ip-script>
master_list:
- <master-private-ip-1>
- <master-private-ip-2>
- <master-private-ip-3>
resolvers:
- 169.254.169.253
# Choose your security mode: permissive or strict
security: <security-mode>
superuser_password_hash: <hashed-password> # Generated above
superuser_username: <username> # This can be whatever you like
# A custom proxy is optional. For details, see the configuration documentation.
use_proxy: 'true'
http_proxy: http://<user>:<pass>@<proxy_host>:<http_proxy_port>
https_proxy: https://<user>:<pass>@<proxy_host>:<https_proxy_port>
no_proxy:
- 'foo.bar.com'
- '.baz.com'
fault_domain_enabled: false
#If IPv6 is disabled in your kernel, you must disable it in the config.yaml
enable_ipv6: 'false'
Open Source template Open Source
bootstrap_url: http://<bootstrap_ip>:80
cluster_name: <cluster-name>
exhibitor_storage_backend: static
master_discovery: static
ip_detect_public_filename: <relative-path-to-ip-script>
master_list:
- <master-private-ip-1>
- <master-private-ip-2>
- <master-private-ip-3>
resolvers:
- 169.254.169.253
use_proxy: 'true'
http_proxy: http://<user>:<pass>@<proxy_host>:<http_proxy_port>
https_proxy: https://<user>:<pass>@<proxy_host>:<https_proxy_port>
no_proxy:
- 'foo.bar.com'
- '.baz.com'
Create a bootstrap pre-shared key (Optional) Enterprise
For additional security, create a random pre-shared key. This key will be used to authenticate requests very early in the installation process. This key will later be transferred to your master nodes and should be present on your bootstrap node at genconf/ca/psk for the duration of the installation process.
mkdir genconf/ca
cat /dev/urandom | tr -dc 'a-z' | fold -w 16 | head -n1 > genconf/ca/psk
chmod 600 genconf/ca/psk
Install DC/OS
In this step, you will create a custom DC/OS build file on your bootstrap node and then install DC/OS onto your cluster. With this method you
- Package the DC/OS distribution yourself
- Connect to every server manually
- Run the commands
You can find additional information and a more detailed remediation procedure in our latest critical product advisory. Enterprise
Prerequisites
- A
genconf/config.yamlfile that is optimized for manual distribution of DC/OS across your nodes. - A
genconf/license.txtfile containing your DC/OS Enterprise license. Enterprise - A
genconf/ip-detectscript.
The term dcos_generate_config file refers to either a dcos_generate_config.ee.sh file or dcos_generate_config.sh file, based on whether you are using the Enterprise or Open Source version of DC/OS.
-
Download and save the dcos_generate_config file to your bootstrap node. This file is used to create your customized DC/OS build file. Contact your sales representative or sales@mesosphere.com for access to this file. Enterprise
OR
-
Download and save the dcos_generate_config file to your bootstrap node. This file is used to create your customized DC/OS build file. Open Source
curl -O https://downloads.dcos.io/dcos/stable/dcos_generate_config.sh
-
From the bootstrap node, run the DC/OS installer shell script to generate a customized DC/OS build file. The setup script extracts a Docker container that uses the generic DC/OS install files to create customized DC/OS build files for your cluster. The build files are output to
./genconf/serve/.You can view all of the automated command line installer options with:
dcos_generate_config.ee.sh --helpflag Enterprise ORdcos_generate_config.sh --helpflag. Open Source
Enterprise
sudo bash dcos_generate_config.ee.sh
At this point your directory structure should resemble:
├── dcos-genconf.c9722490f11019b692-cb6b6ea66f696912b0.tar
├── dcos_generate_config.ee.sh
├── genconf
│   ├── config.yaml
│   ├── ip-detect
│   ├── license.txt
Open Source
sudo bash dcos_generate_config.sh
At this point your directory structure should resemble:
    ├── dcos-genconf.<HASH>.tar
    ├── dcos_generate_config.sh
    ├── genconf
    │   ├── config.yaml
    │   ├── ip-detect
- For the install script to work, you must have created
genconf/config.yamlandgenconf/ip-detect.
-
From your home directory, run the following command to host the DC/OS install package through an NGINX Docker container. For
<your-port>, specify the port value that is used in thebootstrap_url.sudo docker run -d -p <your-port>:80 -v $PWD/genconf/serve:/usr/share/nginx/html:ro nginx -
Run the following commands on each of your master nodes in succession to install DC/OS using your custom build file:
-
If created, copy the pre-shared key to your master nodes at /var/lib/dcos/.dcos-bootstrap-ca-psk
scp -p genconf/ca/psk <master-ip>:/var/lib/dcos/.dcos-bootstrap-ca-psk -
SSH to your master nodes.
ssh <master-ip> -
Make a new directory and navigate to it.
mkdir /tmp/dcos && cd /tmp/dcos -
Download the DC/OS installer from the NGINX Docker container, where
<bootstrap-ip>and<your_port>are specified inbootstrap_url.curl -O http://<bootstrap-ip>:<your_port>/dcos_install.sh -
Run the following command to install DC/OS on your master nodes.
sudo bash dcos_install.sh master
-
-
Run the following commands on each of your agent nodes to install DC/OS using your custom build file:
-
SSH to your agent nodes.
ssh <agent-ip> -
Make a new directory and navigate to it.
mkdir /tmp/dcos && cd /tmp/dcos -
Download the DC/OS installer from the NGINX Docker container, where
<bootstrap-ip>and<your_port>are specified inbootstrap_url.curl -O http://<bootstrap-ip>:<your_port>/dcos_install.sh -
Run this command to install DC/OS on your agent nodes. You must designate your agent nodes as Public agent nodes or Private agent nodes.
-
Private agent nodes:
sudo bash dcos_install.sh slave -
Public agent nodes:
sudo bash dcos_install.sh slave_public
-
Note: If you encounter errors such as
Time is marked as bad,adjtimex, orTime not in syncin journald, verify that Network Time Protocol (NTP) is enabled on all nodes. For more information, see the system requirements documentation. -
-
Monitor the DC/OS web interface and wait for it to display at:
http://<master-node-public-ip>/.
If the panel does not load, take a look at the troubleshooting documentation.
- Enter your administrator username and password.
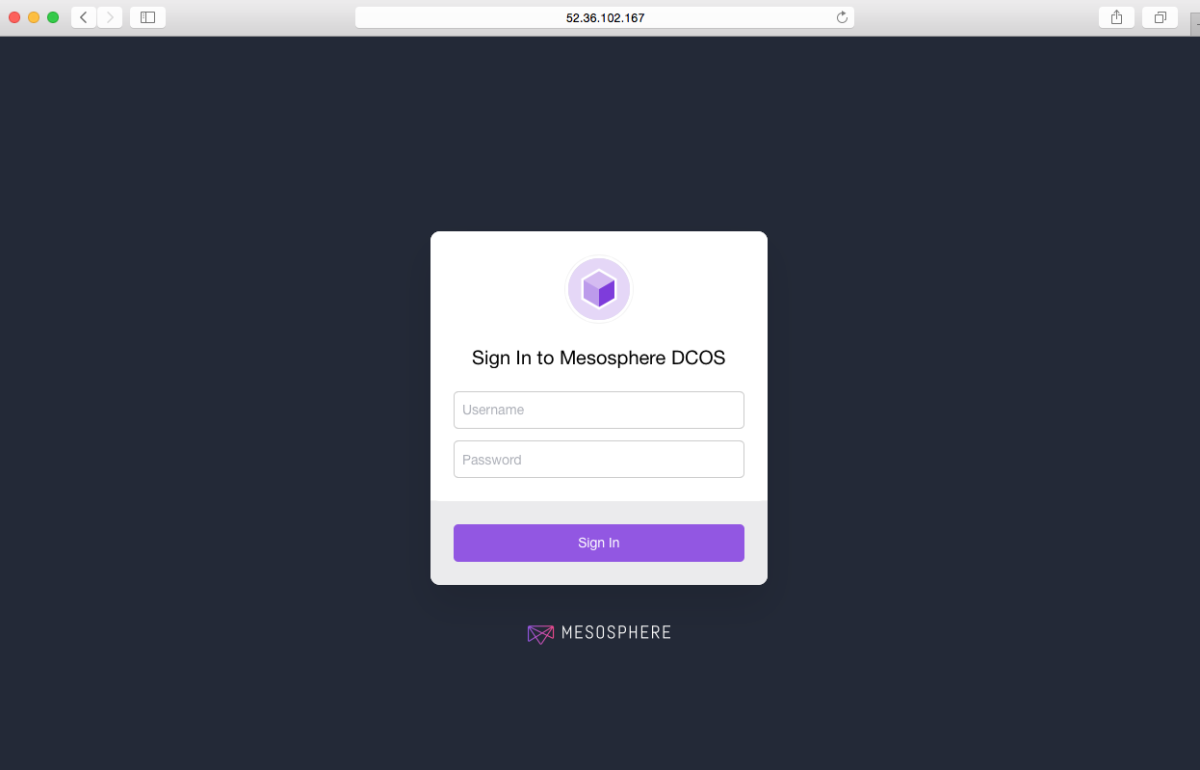
Figure 3. Sign in dialogue
You are done! The UI dashboard will now be displayed.
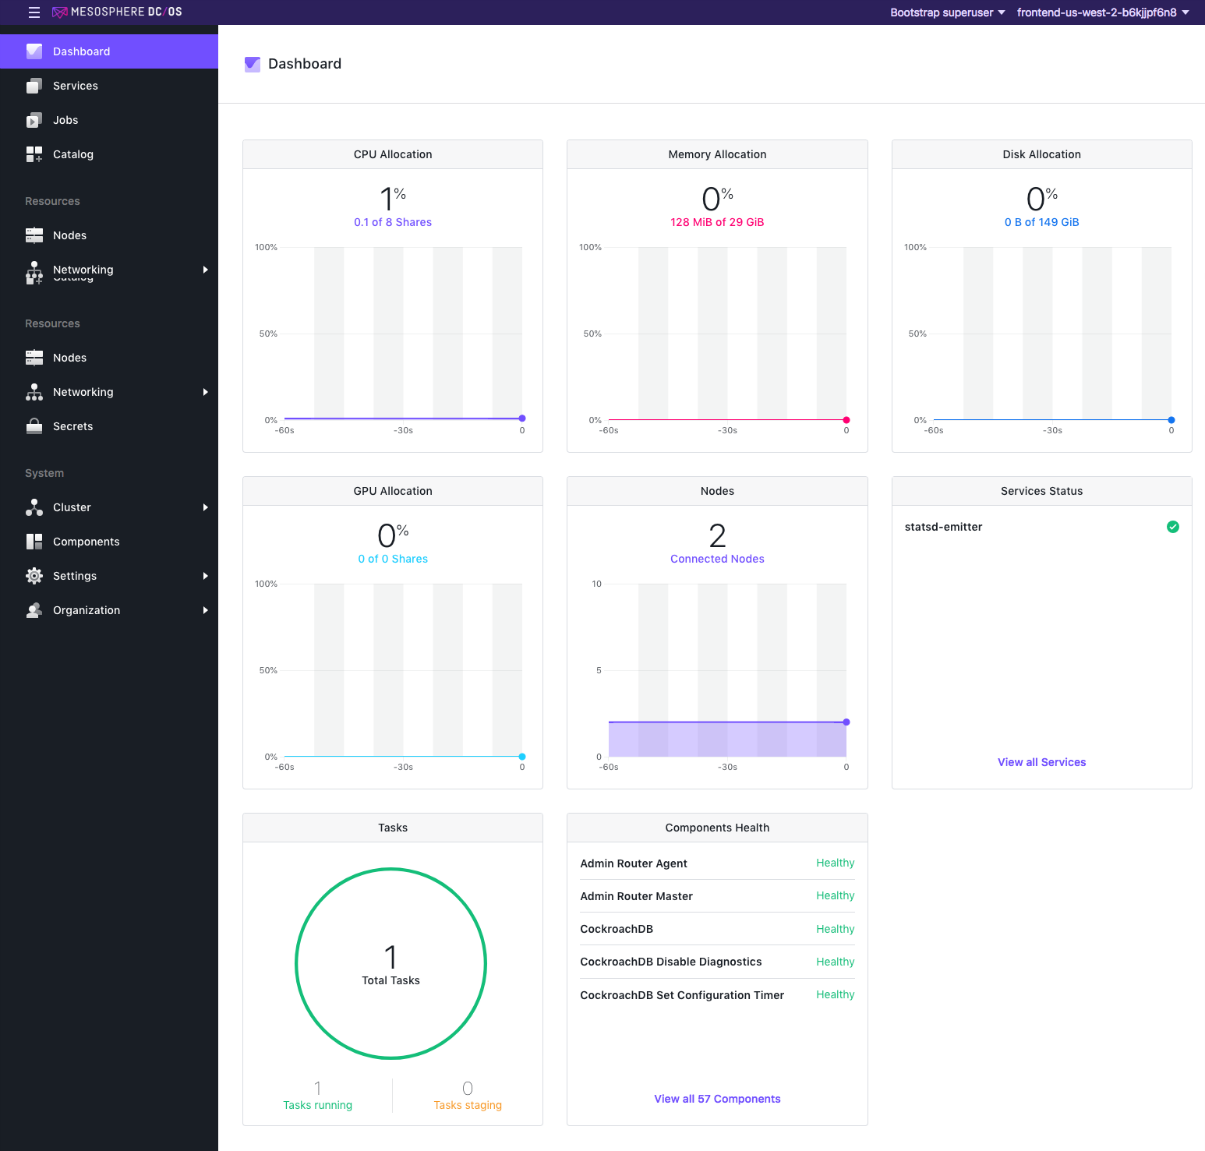
Figure 4. DC/OS UI dashboard
Next Steps: Enterprise and Open Source users
You can find information on the next steps listed below: