
 Kommander Documentation
Before your begin
For more flexible credential configuration, we offer a role-based authentication method with an optional External ID for third party access.
Create role manually
The role should grant permissions to create the following resources in the AWS account:
- EC2 Instances
- VPC
- Subnets
- Elastic Load Balancer (ELB)
- Internet Gateway
- NAT Gateway
- Elastic Block Storage (EBS) Volumes
- Security Groups
- Route Tables
- IAM Roles
The user you delegate from your role must have a minimum set of permissions. Below is the minimal IAM policy required:
{
  "Version": "2012-10-17",
  "Statement": [
    {
      "Sid": "Kommander",
      "Effect": "Allow",
      "Action": [
        "ec2:AttachInternetGateway",
        "ec2:AttachVolume",
        "ec2:AuthorizeSecurityGroupEgress",
        "ec2:AuthorizeSecurityGroupIngress",
        "ec2:CreateInternetGateway",
        "ec2:CreateRoute",
        "ec2:CreateSecurityGroup",
        "ec2:CreateSubnet",
        "ec2:CreateTags",
        "ec2:CreateVolume",
        "ec2:CreateVpc",
        "ec2:CreateVpcEndpoint",
        "ec2:DeleteInternetGateway",
        "ec2:DeleteKeyPair",
        "ec2:DeleteRoute",
        "ec2:DeleteTags",
        "ec2:DeleteSecurityGroup",
        "ec2:DeleteSubnet",
        "ec2:DeleteVolume",
        "ec2:DeleteVpc",
        "ec2:DeleteVpcEndpoints",
        "ec2:DescribeAccountAttributes",
        "ec2:DescribeAvailabilityZones",
        "ec2:DescribeImages",
        "ec2:DescribeInstanceAttribute",
        "ec2:DescribeInstanceCreditSpecifications",
        "ec2:DescribeInstances",
        "ec2:DescribeInternetGateways",
        "ec2:DescribeKeyPairs",
        "ec2:DescribeNetworkAcls",
        "ec2:DescribeNetworkInterfaces",
        "ec2:DescribeRegions",
        "ec2:DescribeRouteTables",
        "ec2:DescribeSecurityGroups",
        "ec2:DescribeSubnets",
        "ec2:DescribeTags",
        "ec2:DescribeVolumes",
        "ec2:DescribeVpcAttribute",
        "ec2:DescribeVpcClassicLink",
        "ec2:DescribeVpcClassicLinkDnsSupport",
        "ec2:DescribeVpcs",
        "ec2:DescribeVpcEndpoints",
        "ec2:DescribeVpcEndpointConnectionNotifications",
        "ec2:DescribeVpcEndpointConnections",
        "ec2:DescribeVpcEndpointServiceConfigurations",
        "ec2:DescribeVpcEndpointServicePermissions",
        "ec2:DescribeVpcEndpointServices",
        "ec2:DescribeVpcPeeringConnections",
        "ec2:DescribePrefixLists",
        "ec2:DetachInternetGateway",
        "ec2:DetachNetworkInterface",
        "ec2:DetachVolume",
        "ec2:ImportKeyPair",
        "ec2:ModifyInstanceAttribute",
        "ec2:ModifySubnetAttribute",
        "ec2:ModifyVpcAttribute",
        "ec2:ModifyVpcEndpoint",
        "ec2:RevokeSecurityGroupEgress",
        "ec2:RevokeSecurityGroupIngress",
        "ec2:RunInstances",
        "ec2:TerminateInstances",
        "elasticloadbalancing:AddTags",
        "elasticloadbalancing:ApplySecurityGroupsToLoadBalancer",
        "elasticloadbalancing:AttachLoadBalancerToSubnets",
        "elasticloadbalancing:ConfigureHealthCheck",
        "elasticloadbalancing:CreateLoadBalancer",
        "elasticloadbalancing:CreateLoadBalancerListeners",
        "elasticloadbalancing:DeleteLoadBalancer",
        "elasticloadbalancing:DescribeLoadBalancerAttributes",
        "elasticloadbalancing:DescribeLoadBalancers",
        "elasticloadbalancing:DescribeTags",
        "elasticloadbalancing:ModifyLoadBalancerAttributes",
        "elasticloadbalancing:RegisterInstancesWithLoadBalancer",
        "iam:AddRoleToInstanceProfile",
        "iam:CreateInstanceProfile",
        "iam:CreateRole",
        "iam:DeleteInstanceProfile",
        "iam:DeleteRole",
        "iam:DeleteRolePolicy",
        "iam:GetInstanceProfile",
        "iam:GetRole",
        "iam:GetRolePolicy",
        "iam:ListAttachedRolePolicies",
        "iam:ListInstanceProfilesForRole",
        "iam:ListRolePolicies",
        "iam:PassRole",
        "iam:PutRolePolicy",
        "iam:RemoveRoleFromInstanceProfile",
        "sts:GetCallerIdentity",
        "resource-groups:ListGroups",
        "tag:GetResources",
        "tag:GetTagKeys",
        "tag:GetTagValues",
        "tag:TagResources",
        "tag:UntagResources"
      ],
      "Resource": "*"
    }
  ]
}
Make sure to also add a correct trust relationship to the created role.
This example allows everyone within the same account to AssumeRole with the created role.
YOURACCOUNTRESTRICTION must be replaced with the AWS Account ID you would like to AssumeRole from.
{
  "Version": "2012-10-17",
  "Statement": [
    {
      "Effect": "Allow",
      "Principal": {
        "Service": "ec2.amazonaws.com",
        "AWS": "arn:aws:iam::YOURACCOUNTRESTRICTION:root"
      },
      "Action": "sts:AssumeRole"
    }
  ]
}
To use the role created, attach the following policy to the role which is already attached to your Kommander cluster.
Replace YOURACCOUNTRESTRICTION with the AWS Account ID where the role you like to AssumeRole is saved. Also, replace THEROLEYOUCREATED with the AWS Role name.
{
  "Version": "2012-10-17",
  "Statement": [
    {
      "Sid": "AssumeRoleKommander",
      "Effect": "Allow",
      "Action": "sts:AssumeRole",
      "Resource": "arn:aws:iam::YOURACCOUNTRESTRICTION:role/THEROLEYOUCREATED"
    }
  ]
}
Create role when creating the management cluster
Instead of creating the role manually, create the following file, iam-stsAssumeKommander.tf, in the extras/provisioner/ directory, next to your cluster.yaml file. This creates the role when you create or update your cluster with konvoy up. Ensure you replace THEROLEYOUCREATED with the AWS Role name.
# Attaching sts:AssumeRole to the default node role from konvoy
resource "aws_iam_role_policy" "agent_policy_assumerole_kommander" {
  count = "${var.create_iam_instance_profile ? 1 : 0}"
  name  = "AssumeRoleKommander"
  role  = "${aws_iam_role.node_role.id}"
  policy = <<EOF
{
    "Version": "2012-10-17",
    "Statement": [
        {
            "Sid": "AssumeRoleKommander",
            "Effect": "Allow",
            "Action": "sts:AssumeRole",
            "Resource": "arn:aws:iam::YOURACCOUNTRESTRICTION:role/THEROLEYOUCREATED"
        }
    ]
}
EOF
}
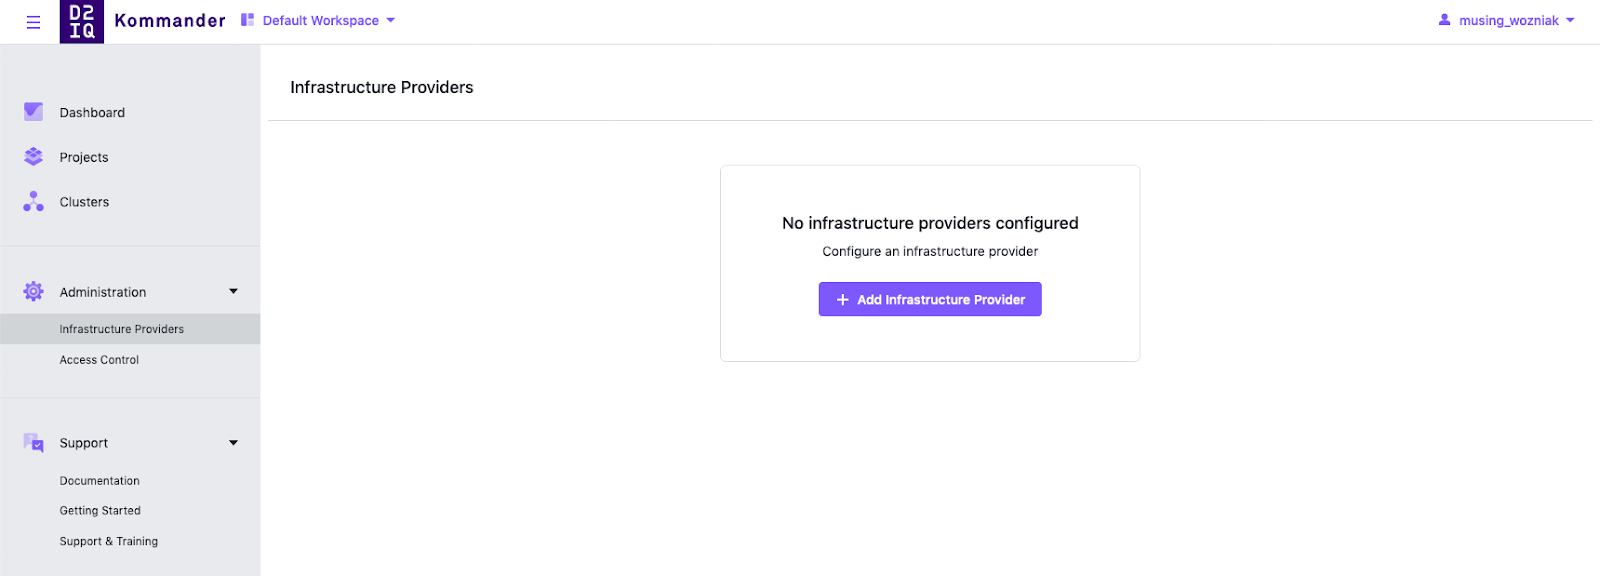
Create Infrastructure Provider
-
In Kommander, select the Workspace associated with the credentials you are adding.
-
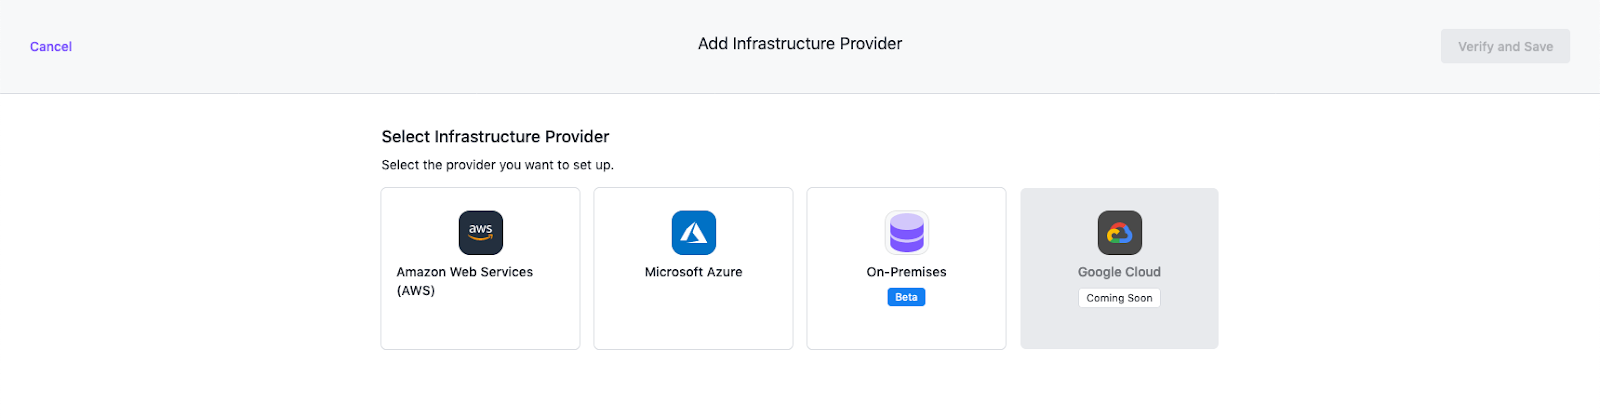
Go to Administration > Infrastructure Providers and select the Add Infrastructure Provider button.
-
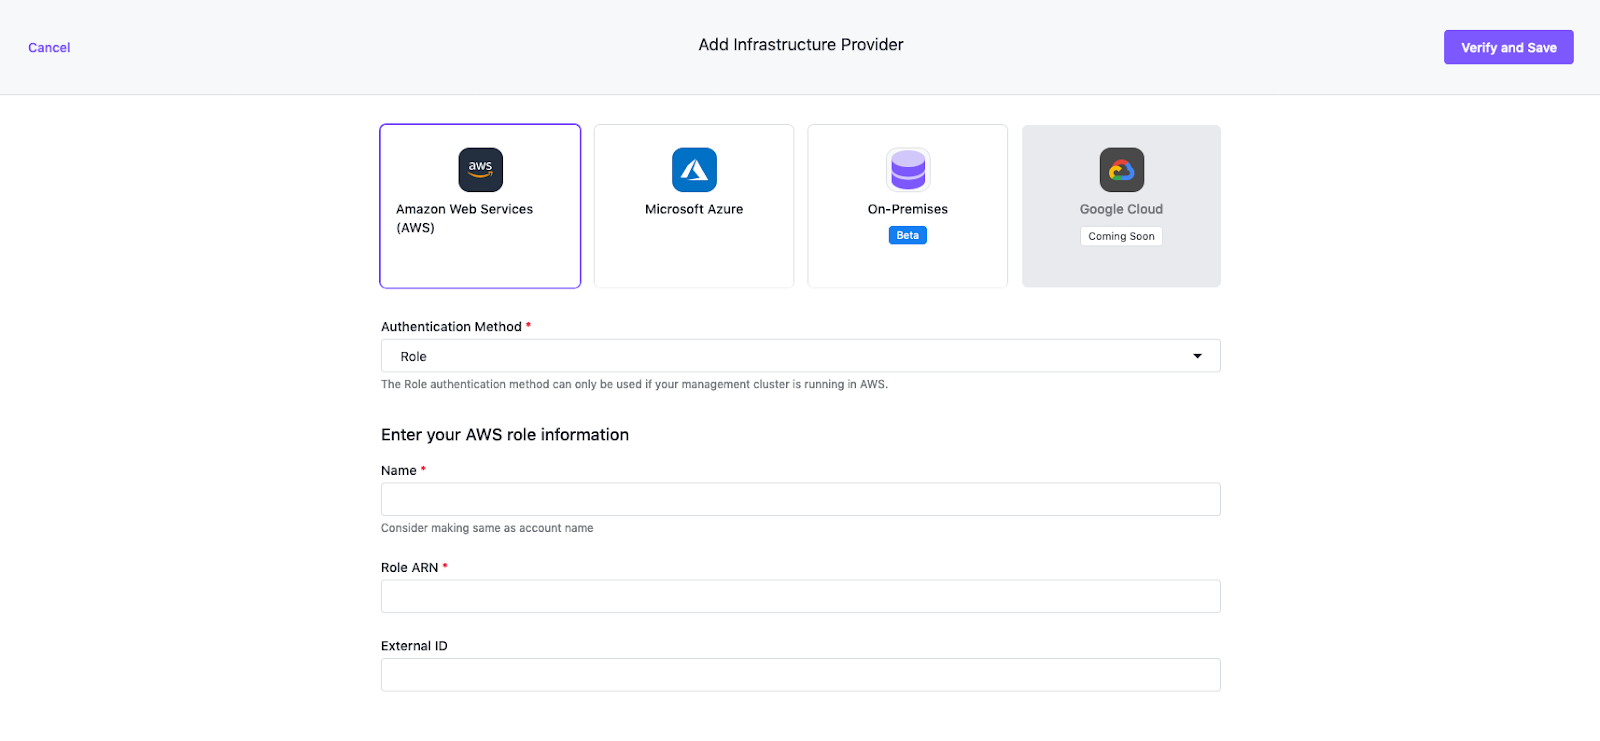
Select the Amazon Web Services (AWS) option.
-
Ensure Role is selected as the Authentication Method.
-
Enter a name for your infrastructure provider. Select a name that matches the AWS user.
-
Enter the Role ARN.
-
You can add an External ID if you share the Role with a 3rd party. External IDs secure your environment from accidentally used roles. You can read more about External IDs in the AWS documentation.
-
Select Verify and Save to verify the credentials are valid and to save your provider.
After the provider is created, the display name or role can be updated.