
 Kommander Documentation
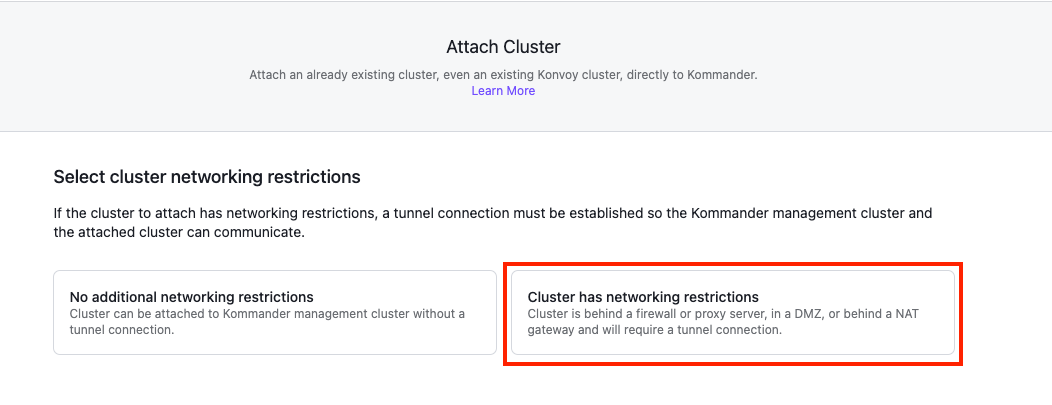
Use this option when you want to attach a cluster that is in a DMZ, behind a NAT gateway, behind a proxy server or a firewall, or that requires additional access information. This procedure gathers the information required to create a kubeconfig file for the network tunnel between Kommander and the cluster you want to attach.
-
In the selected workspace Dashboard, select the Add Cluster option in the Actions dropdown menu at the top right.
-
On the Add Cluster page, select Attach Cluster.
-
Select the Cluster has networking restrictions card to display the configuration page.
-
Enter the Cluster Name of the cluster you’re attaching and select a Workspace from the dropdown list (if entering the Add Cluster menu from the Global workspace).
-
Create additional new Labels as needed.
-
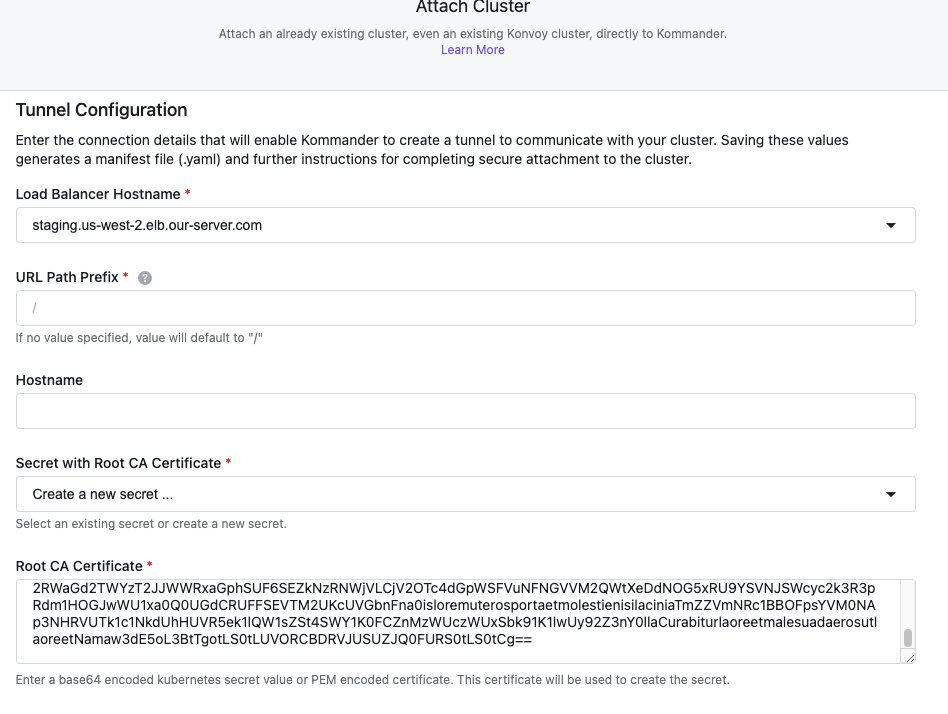
Select the Load Balancer Hostname which is the Ingress for the cluster from the dropdown menu. You will want the hostname to match the Kommander Host cluster that you are attaching your existing cluster with network restrictions to.
-
Specify the URL Path Prefix for your Load Balancer Hostname. This URL path will serve as the prefix for the specific tunnel services you want to expose on the Kommander management cluster. If no value is specified, the value defaults to
/. -
(Optional) Enter a value for the Hostname field.
-
If you have not attached this cluster before, you must create a new secret in the Root CA Certificate drop down menu. To do this, go to your Konvoy management cluster, and enter:
hostname=$(kubectl get service -n kubeaddons traefik-kubeaddons -o jsonpath="{.status.loadBalancer.ingress[0].hostname}")
b64ca_cert=$(kubectl get secret -n cert-manager kubernetes-root-ca -o=go-template='{{index .data "tls.crt"}}')
To view your base64 encoded Kubernetes secret value to copy and paste into the Root CA Certificate field, run:
echo $(kubectl get secret -n cert-manager kubernetes-root-ca -o=go-template='{{index .data "tls.crt"}}')Otherwise, select from the list of available Secrets.
-
Add any Extra Annotations as needed.
-
Select the Save & Generate kubeconfig button to generate the kubeconfig file for the network tunnel.
After the above is complete, finish attaching the cluster to Kommander.
As an alternative procedure, you can follow these instructions to Use CLI to Add Managed Clusters to Kommander.
For information on TunnelGateway, review the API documentation.